It's been a while since the last post and a lot has happened, although it was mostly just routine beekeeping. We harvested our fall honey at the end of August and, like our summer harvest, ended up with a lot! I think we estimated we got around 150 lbs this year, which is around 12 gallons. Several of the super frames had capped and uncapped larvae, so I didn't extract those, but I didn't put them back in the hive either. I may put new foundation in those frames this winter, otherwise we'll put them in the second supers next year and hopefully the bees will clean things up and the queen won't go up there to lay again.
In early September we did our three applications of Api-Life Var to the hives, seven days apart. I've never done any mite counts, so they may not even be necessary, but I'm going to err on the side of caution since they seem to be a prevalent pest in beehives. During part of the medication I added a third empty hive body above the inner cover and began making 1:1 syrup to feed to the bees in the half-gallon quail waterers that I use. I mixed in some Fumagilin medication to help with any nosema the bees may have. I've been feeding about a gallon per week per hive for a little over a month and the average daily temperature is getting much cooler now, so I think I'm about done. I need to make some more candy and then i'll be time to wrap them with homasote for the winter.
Thursday, October 24, 2013
Sunday, July 21, 2013
Crosswired super frames
After last weekend's check and lifting those heavy supers, I figured I should get some more supers on. But I was also tired of breaking comb when extracting honey, so I bought some frame wire and tools to install it. I put together a new super and new frames with foundation. I don't know why it's taken me so long to try cross-wiring my frames; it wasn't that hard. I bought a wire crimper that is helpful in making the wires very taut. I don't have any equipment to embed the wires (melt them into the foundation), but for supers where they're just putting in honey, I'm hoping that won't be a problem and they'll just build out the comb around the wires. Time will tell... I'd like to build an electric embedder, but not sure when I'll get around to it.
Since I only had one more super with 10 frames of foundation ready, on this weekend's trip to the hives, I split it up and swapped 2 or 3 foundation frames for full frames in each of the hives.
Hive A was looking a little better this week. They had a couple queen cups with royal jelly that they didn't have last week, so it looks like they're working on raising a queen. I swapped them a frame with eggs and larva from hive B, just to help out.
Hive B is doing just grand.
Hive C is starting to worry me a little. I went through some of the deep frames closer and they didn't really have many eggs or brood. What they did have looked good, but I decided to give them a boost as well and swapped a frame of eggs and brood from hive B into C. I'll keep an eye on them and see if the egg laying increases. Hive C did seem a bit more agitated than normal as I went through their frames, which can sometimes be a sign that they're not happy about their queen situation...
Hive D is still odd. Lots of honey in the upper deep, but they're still keeping lots of comb open for the queen. Heck, they didn't even start to draw out that brand new deep foundation frame I put in the center of the upper deep a week ago. Like in hive C, what eggs, larva and capped cells I do see look good. I was just expecting more of them...
I haven't seen any queens in C or D for a while, so maybe I should look closer for her next time.
Saturday, July 13, 2013
Laying workers
Checked the hives today and things are going great in B and C. Hive A has a laying worker. This I know because I only found drone cells and they were very spotty. Instead of trying to introduce a new queen, I'm trying to deal with it using the method described by Michael Bush where I will add a frame or two of open brood and eggs every week for three or four weeks and let the hive work things out by raising a new queen. Based on this, I took I swapped empty frames from A with frames of eggs and brood from B and C. I'll continue doing this for a couple weeks and check on the progress.
Hive D is still really honey bound in the upper deep. It does have some good looking eggs, larvae and capped cells, but not as much as I was hoping. The laying pattern looks good, so I'll just wait for now and give them some time. I did remove one fully capped honey frame from the top deep and replace it with foundation just to give them some more space.
When checking the hives, I had to lift off all the supers and they were really heavy. It's only been two weeks since we harvested, so I'm assembling another super or two with some woodenware parts I have in the basement. I'll put those on when I'm done and adjust the new suuper foundation frames amongst the hives as needed.
Sunday, June 30, 2013
Honey harvesting
After the last hive check, we thought it was time to harvest the honey. So I spent a warm sunny afternoon removing the honey supers with the assistance of some Bee Quick and my shopvac set to blower mode. It's amazing how well that Bee Quick works; gets all but a couple stragglers out of the supers and then I blow the rest out with my shopvac.
Based on the weight of the supers, I was guessing we'd have our best harvest yet. That evening I went through the first four supers and extracted only the frames that were 90% capped. We only have a cheap 2-frame hand-crank plastic extractor, so it takes a while because I have to keep flipping the frames to prevent frames from breaking. Even so I always end up breaking a couple frames which just increases my resolve to start cross-wiring the foundation. I returned those four supers to the hives the next day. Then I extracted the honey from the next four supers the next evening and returned those supers the next night (including a couple replacement foundation frames). In all we got over 76lbs of honey, which equates to around 25 quart jars. Woohoo! We're in the honey! We're in the honey!
Based on the weight of the supers, I was guessing we'd have our best harvest yet. That evening I went through the first four supers and extracted only the frames that were 90% capped. We only have a cheap 2-frame hand-crank plastic extractor, so it takes a while because I have to keep flipping the frames to prevent frames from breaking. Even so I always end up breaking a couple frames which just increases my resolve to start cross-wiring the foundation. I returned those four supers to the hives the next day. Then I extracted the honey from the next four supers the next evening and returned those supers the next night (including a couple replacement foundation frames). In all we got over 76lbs of honey, which equates to around 25 quart jars. Woohoo! We're in the honey! We're in the honey!


Friday, June 21, 2013
Hive check
Haven't checked all the hives for a while, so with the good weather today, we decided it would be a good time for it. On a brief side note, I put two supers on hive D a week ago and I did a quick check in the deeps and didn't see any eggs or brood.
Today I started at hive A and went through all of them. I didn't do a frame by frame check on everything and didn't find spot any queens today. It's also hot enough that I completely pulled out the entrance reducers. I didn't see any eggs, larva or brood in hive A, but I did see a beautiful capped swarm cell at the bottom of a frame. Lots of pollen and honey in the deeps, but it looks like they're holding a good cell pattern open for new eggs. For the time being, I'm going to assume a new queen will emerge from that swarm cell, but I also transferred one frame with eggs and larva from hive B to hive A to help them stay calm.
Hive B was doing great. Lots of eggs, brood and larva, so it looks like they've got a healthy queen. I didn't see any swarm cells.
Hive C is also doing great. Lots of eggs, brood and larva, so it looks like a good queen here too.
Hive D is pretty honey bound in the upper deep, but the bottom deep has quite a lot of open cells. Good news, I saw eggs and larva on multiple frames in the bottom deep. Not a whole lot, so I did swap a frame from hive C with eggs and larva in to give them a boost.
On the honey front, just about all the supers were getting very full and I figured we'd be ready to harvest the summer honey in about another week. Right now we've got two supers per hive. The top super on hive D still had a lot of foundation, so I swapped a few of those with full honey frames from supers on hives B and C.
Overall, I think things are going well. I'm still not sure if it was hive A or D that swarmed, but I'm thinking it was A now. Anyway, I'll keep an eye on hive A and make sure there's some new eggs in the next two weeks.
Friday, June 14, 2013


Tuesday, June 4, 2013
New swarm trap
So this spring, with the move of the hives, we had to come up with a new location for the swarm trap we had. We had our original swarm trap on the side of our shed, which is just around the corner from where the bees were. It was one of those giant peat pot type traps and in the 2 or 3 years we had it up, I never saw a bee in it. Might be time to make a new swarm trap. After a little internet research, I decided to make a swarm trap that is actually very similar to a nuc box. I got some pine boards and after a little cutting and nailing, had a nice swarm trap that held 5 deep frames nicely. We have a nice tree about 35' in front of the new hive location and I attached it about 9 ft up on May 30, 2013. I also removed the feeders and installed two shallow supers on the three strong hives.
Over the next few days we noticed there were bees checking it out (I baited the trap with two old drawn frames and two frames of foundation, and a few drops of lemongrass oil). This evening I checked the trap again and there were a ton of bees going in and out, so I suited up and sure enough, the swarm trap was completely full of bees. I took the trap down and found it had one of our marked queens, but I'm not sure which hive it came from. While inspecting the swarm I discovered they had been very busy and had quite a lot of comb drawn out in the space where the missing frame was. They had also drawn the two foundations frames a lot. I didn't see any eggs yet, but there was a lot of nectar being stored. I removed the two old frames, shaking the bees back into the trap, scraped off the burr comb and installed three more frames of foundation.
We don't have equipment for another full hive, so we'll be giving this swarm to some local beekeepers. I learned I have to come up with a better way to mount the hive to the tree because it's a pain to take it off and put it back up, especially when on a ladder and surrounded by so many bees. However, I'm pretty pleased with how well the swarm trapped worked.
 |
| Swarm trap near hives |
Over the next few days we noticed there were bees checking it out (I baited the trap with two old drawn frames and two frames of foundation, and a few drops of lemongrass oil). This evening I checked the trap again and there were a ton of bees going in and out, so I suited up and sure enough, the swarm trap was completely full of bees. I took the trap down and found it had one of our marked queens, but I'm not sure which hive it came from. While inspecting the swarm I discovered they had been very busy and had quite a lot of comb drawn out in the space where the missing frame was. They had also drawn the two foundations frames a lot. I didn't see any eggs yet, but there was a lot of nectar being stored. I removed the two old frames, shaking the bees back into the trap, scraped off the burr comb and installed three more frames of foundation.
We don't have equipment for another full hive, so we'll be giving this swarm to some local beekeepers. I learned I have to come up with a better way to mount the hive to the tree because it's a pain to take it off and put it back up, especially when on a ladder and surrounded by so many bees. However, I'm pretty pleased with how well the swarm trapped worked.
 |
| Caught a swarm within 5 days of putting it up |
 |
| Inspecting swarm trap on left |
Sunday, May 19, 2013
Hoophouse: The frame goes up
Time to start the real construction! My parents were visiting today and
I hijacked them to help get the hoophouse frame up. They ended up
helping me the entire afternoon, but we got a lot done.
I did most of the work getting the base together and level before they arrived. The spot in our garden where the hoophouse is going isn't quite even, so I had to dig down a bit on two sides to get the base level. I attached the 2'x8' hemlock lumber together with some long lag screws.


The EMT hoops will attach to the base on the inside of the base with strapping and lag screws. For the end hoops, I had to bend one end of the strapping and screw it into the end of the 16' base side before attaching the base ends.

This hoophouse shouldn't be going anywhere, but it'll act like a big sail and we get some string winds, so we also added four 4"x4" post anchors. They're screwed to the base and buried about 18" down. This should give the entire building some more stability.

With the base done, I marked off the locations for the hoops: every 27" on center, except the middle two hoops which would have a 30" separation. My parents held the hoops plumb and in place while I attached them with the two pieces of EMT strapping. This part went pretty fast and soon we had all eight hoops up. To add more support to the hoops, I drilled 1/4" holes through them, between the two strapping pieces and installed a lag screw to really secure them to the base.


The 16' ridge purlin was made from two 10' 3/4" EMT conduit pieces. I cut one piece to 6' and spliced it with a 10' piece. Installing the purlin was also pretty easy since I had the connectors already in place, but it was still a two person job and we had to make sure the hoops were evenly spaced at the ridge before tightening the connectors.


With just that, the hoops were feeling pretty stable, but I had fashioned some diagonal braces to attach on the sides to add more rigidity. These braces were made from 5' sections of 3/4" EMT. I pounded about 1 1/2" flat on each end with a sledgehammer and bench vise. Note that the flattened sections are perpendicular to each other because one end is lag screwed to the top of the base frame and the other end is attached to a hoop with a self-drilling tek screw.


We installed a siderail/kneerail (made from two 1"x4"x8' boards spliced in the middle) on each side, attaching them with more EMT strapping and 3/4" wood screws. The strapping pieces on the end had to have one end bent around and screwed into the end of the board because we don't want the board sticking out beyond the end hoops. The siderails are multipurpose. They're used to tie the hoops together and will have wigglewire installed on the outside to attach the plastic to. They will also be used when installing the roll-up sides.


The hoops were now done, on to framing in the end walls. I had another 2"x8"x12' plank and cut that in half and nailed it to the middle inside of each base end. That gave me a 4"x6' base top to frame off of. The end frames are very simple with four vertical 2x4s and one header 2x4. The door frame was set for 36" wide. All the 2x4s were attached with framing nails for metal framing brackets and wood screws. The header 2x4 was attached to the end hoop with a modified piece of EMT strapping.


This guy is licensed to drill!


Saturday, May 18, 2013
More spring maintenance
I got back in the bees today with a few objectives. I had to refill their half gallon feeders with syrup and remove the inserts from below the screened bottom boards. I checked on hive D, the weak hive that I added some egg and brood frames to a couple weeks prior. Turns out they're doing great now. I saw the marked queen and plenty of new eggs that looked good. The hive's honey supply has also greatly decreased as they've been building up. I went through a some of the other hives a bit to check on things. No swarm cells yet (yah) and all the hives appear to be building up well with good eggs and brood. I found the queen in hive A. She had a faint mark from a previous year, so I marked her again to make it more visible. I swapped out a couple old frames with some new foundation frames.
I've also been working on a new swarm trap. It's basically a homemade nuc box as it's the same size and will hold five deep frames, but will have a larger entrance hole. It's about done. Need to paint it, get some hardware cloth for the hole to keep birds out and then hang it in a nearby tree with some old frames in it for bait. With the rate the bees are going, I wouldn't be surprised if we get a couple swarms this year. Not sure what we'll do with them since we don't have any more hives, but I'm sure someone would take them off our hands.
I've also been working on a new swarm trap. It's basically a homemade nuc box as it's the same size and will hold five deep frames, but will have a larger entrance hole. It's about done. Need to paint it, get some hardware cloth for the hole to keep birds out and then hang it in a nearby tree with some old frames in it for bait. With the rate the bees are going, I wouldn't be surprised if we get a couple swarms this year. Not sure what we'll do with them since we don't have any more hives, but I'm sure someone would take them off our hands.
Wednesday, May 15, 2013
Hoophouse progress begins!
Bending the conduit.


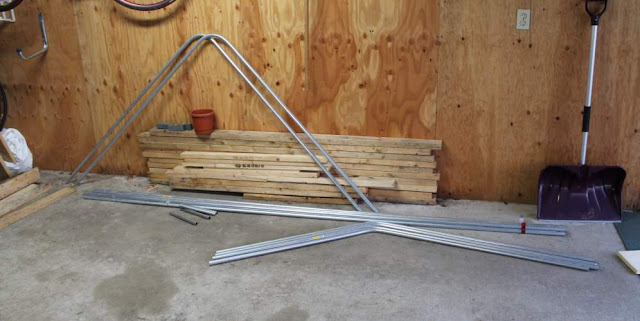
Top pipes are 3/4" EMT, bottom left is 1/2" IMC and bottom right is 1/2" EMT. Notice how the IMC fits in snugly, but the EMT is very loose.

Here's how the conduit is "spliced" together. I use a 10" or 12" piece of 1/2" IMC that will go inside the 3/4" EMT. Mark the middle of the IMC piece and insert it into one of the EMT pipes up to the mark. Drill a 1/4" hole through the two pipes a few inches back and insert a 1/4"-20 x 1 1/4" bold through it to hold it. Repeat for the other end of the splice.


The top ridge angle has a hole through it for a purlin connector. Place a 1/4" carriage bolt in a 1/4" drilled hole and tap it down with a hammer a few times and you get a nice squarish hole that will result in a pretty smooth top where the plastic will go. The middle of a 10' EMT pipe is marked before bending it so we know where to drill the hole after the bend.

A finished hoop.

Subscribe to:
Posts (Atom)